sunday: belle of the week
makeup mondays: i will be doing product reviews, giving quick tips, doing a "my favorites from" a certain brand, monthly favorites, (this day will also include hair related things)
try it out tuesdays: i will show you guys something i want you to try out. it could be a recipe, a do-it-yourself project, a workout routine (probably not), just something i enjoy, that i want you to try.
what i wore wednesdays: an outfit of the day (or more) from the current week.
thursday morning thoughts: this could be a huge variety of topics including school, feminism, current events, anything. whatever i feel like talking about that day.
friday: a wild card day
"how i style" saturdays: most weeks, i will have one piece of clothing be the focal point, and do a post on how i style it to make it my own. however, this could also include "steal her style" of celebs, my style inspirations, what's trending on the runway, etc.
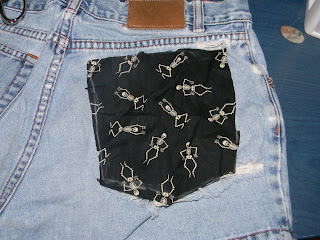
for today's "try it out tuesday", i will be telling you all how to easily design and construct your own denim shorts in less than 30 minutes & under $10!! i get a ton of questions from people on my social media, asking if i will make them these shorts with such and such print, sell them to them, show them how to do it, etc. i didn't want to give away my secret for a long time, because there's just something weird about people having the same exact clothes as me, that i made myself. but now i'm over that and now that i have this blog, i actually have a reason to expose my secret masterpiece in the making. honestly, i'm so handy with a hot glue gun.. i could probably make an entire segment on this blog devoted to that crap, but i won't. i hope you guys enjoy, and if you want to see the step by step tutorial, keep reading :)
- twitter - instagram - pinterest -
1) gather your materials. you will need a pair of shorts with a pocket on the back, a marking pencil or chalk, scissors, a hot glue gun and sticks, and your fabric. for the fabric, i like to use just basic cotton fabric that you can find just about anywhere for as low as a dollar.
2) lay your fabric on top of your pocket, and use your marking pencil to trace around the pocket, making it a little larger than the actual size of your pocket. (the marking pencil/chalk will come out in the washer)
3) cut out your piece of fabric


4. fold over the edges, like shown in the picture, so that they don't fray in the washing machine. glue them down with your hot glue gun. be careful!!! because this is always the part where i burn myself. do this all along the edges of your newly cut fabric. now you'll be left with a piece of fabric, with no rough edges, that should be the same size as your pocket. double check to make sure, and trim the fabric down if it needs it.

7. use the same steps if you want to have both pockets printed, for the sake of this tutorial, i just did one.
8. you'll need to wash and dry your shorts to get your marking pencil off the fabric and to get the wrinkles out.

 it's really that simple, guys. don't worry about buying $50+ shorts from etsy, because you can do it yourself for a fraction of the price, and you get the satisfaction of getting to say "thanks, i made them!" when people compliment your shorts! also, no worries, the hot glue won't get on any of your other garments in the dryer, and the fabric will not come off. i've had my star wars shorts like these (pictured below) for 3+ years, washed them many times, and they are still good to go. you could use this same trick if you're interested in making a pocket tee like the one pictured.
 xo, hailey


No comments:
Post a Comment